Bundle Buddy User Guide
Sep 19th 2023
Integer Bundle Buddy User Guide
Introduction
Thank you for showing interest in the Integer BUNDLE BUDDY pp for BigCommerce. This app allows BigCommerce store admins to create Bundles (customized) and Kits on the BigCommerce Store.
Once you have the app card, our team will install the app for you. Once the app is installed, you can use this step-by-step guide to create or edit bundles and/or kits, manage orders, and change storefront display settings as per your preferences.
Dashboard
Once you login to the app, you can see the dashboard by default.
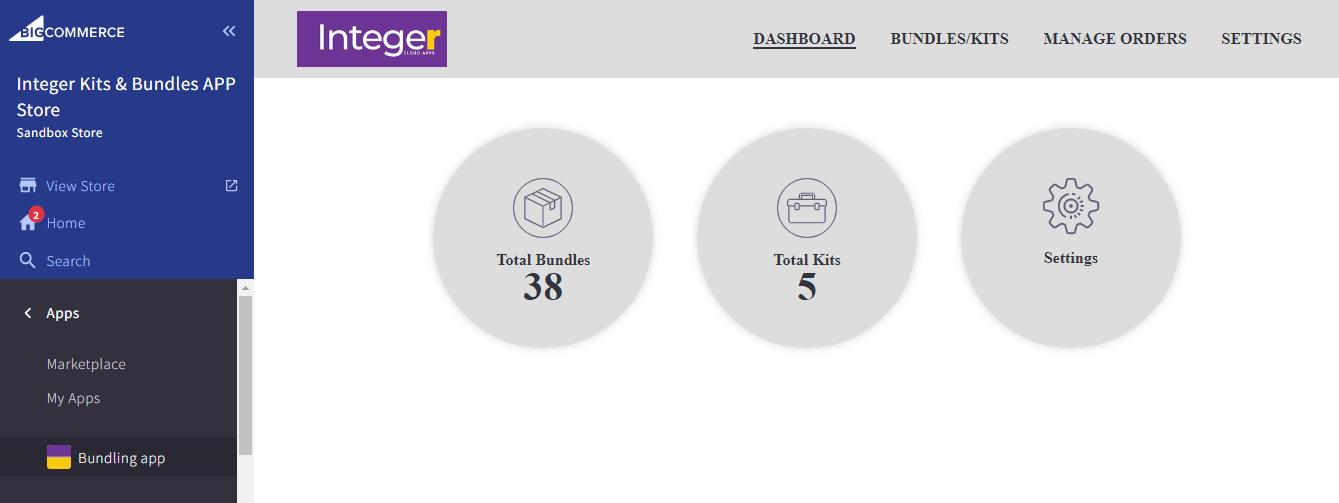
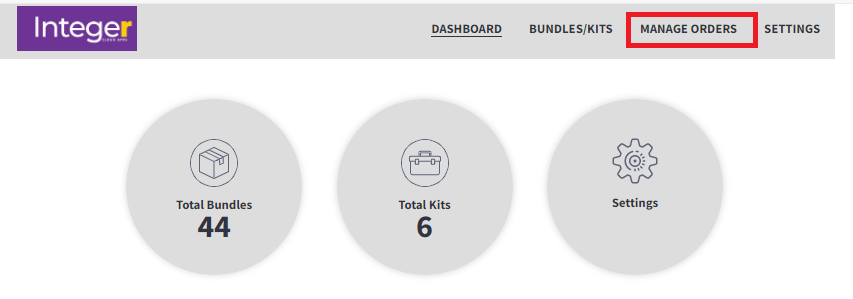
The dashboard has 3 items –
- Total bundles: Displays the total number of bundles created
- Total kits: Displays the total number of kits created
- Settings: To manage the display options on storefront
Settings
You can navigate to the settings page by clicking on the Settings option on the dashboard or from the menu option on top right.
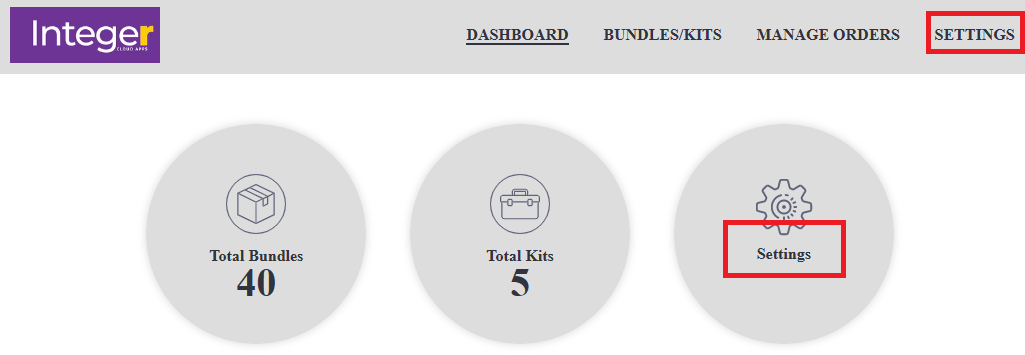
On the settings page, you can change the following options:
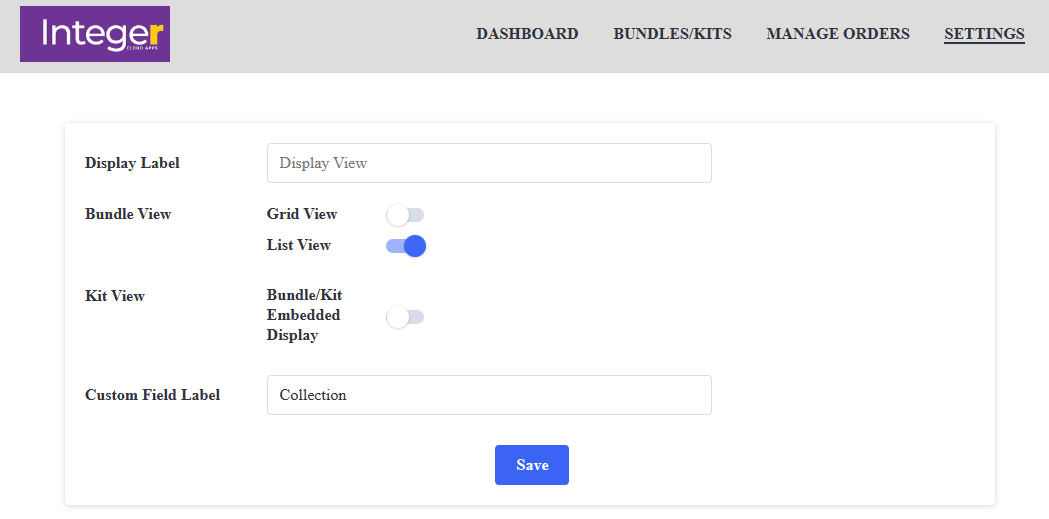
Display Label
The title to be displayed for showing the products of bundles/kits.

Bundle View
There are two options.
Grid View
Shows the items in a grid (side-by-side).
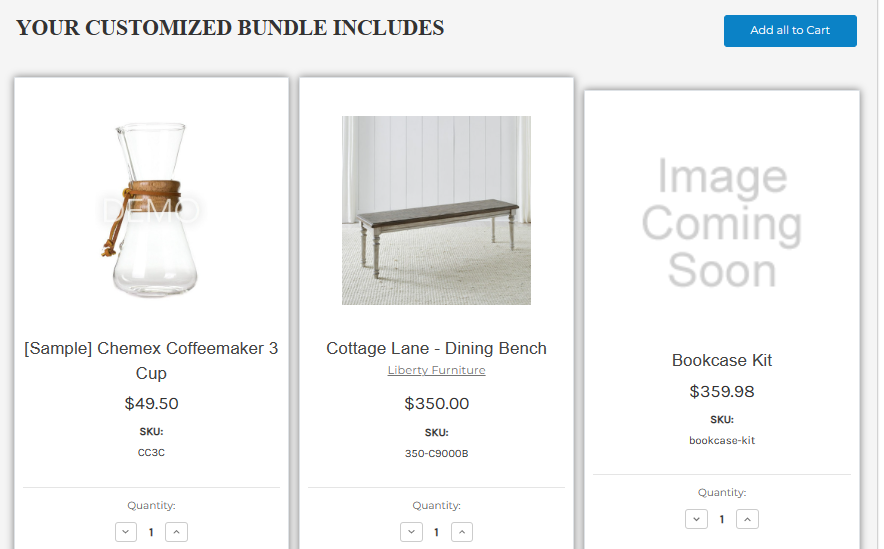
List View
Shows one product in a row, as a list.
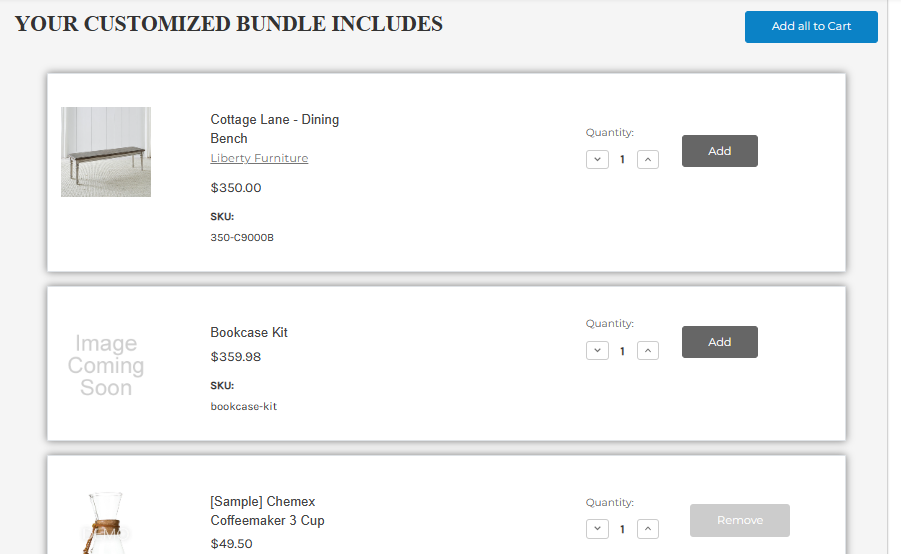
Kit View
Enable this option to display the kit products on the storefront.
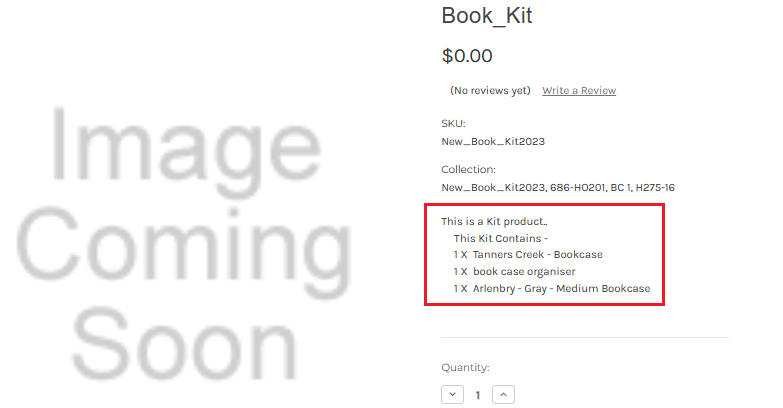
Custom Field Label
The label for bundles in the BigCommerce products page.

View/Add Bundles/Kits from dashboard
There are two ways to add bundles and kits:
- Click on the ‘Total bundles’ or ‘Total kits’ circle on the dashboard
- Select the ‘BUNDLES/KITS’ option from the menu bar
View Bundles
To view the list of bundles, click on the ‘Total bundles’. You will be navigated to the BUNDLES/KITS page and by default, you can see only the bundles.

View Kits
To view the list of kits, click on the ‘Total kits’ circle. You will be navigated to the BUNDLES/KITS page and by default, you can see only the kits.
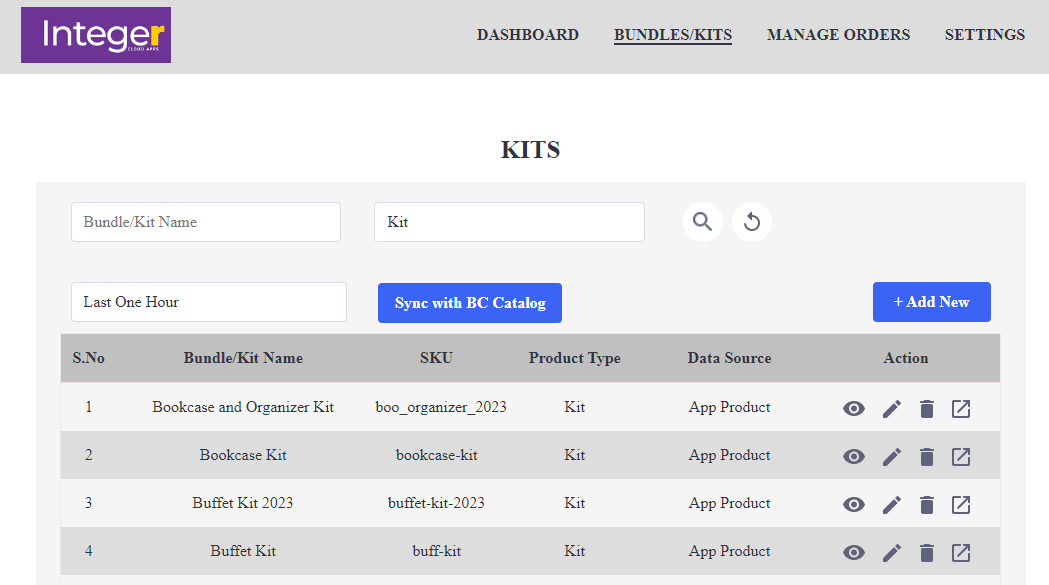
You can view all the product types (both bundles and kits) created on this page. Use the search options to search bundles and kits by name, product type (bundles, kits, all products) and timestamp.


Select the options you want to search with and click on the magnifying glass for search.
Reset
The reset option is to reset the search options selected.
Sync with BC Catalog
Use this button to sync the bundle and its products with the BC catalog.
+ Add New
To add a new Bundle or Kit, click on the Add New button on the right side.

Add bundles
You can manage bundles and kits using the menu option on top.

You will be navigated to the landing page to add a new bundle/kit. Click on the Add New button.
You will get a page where you can add the bundle or kit.
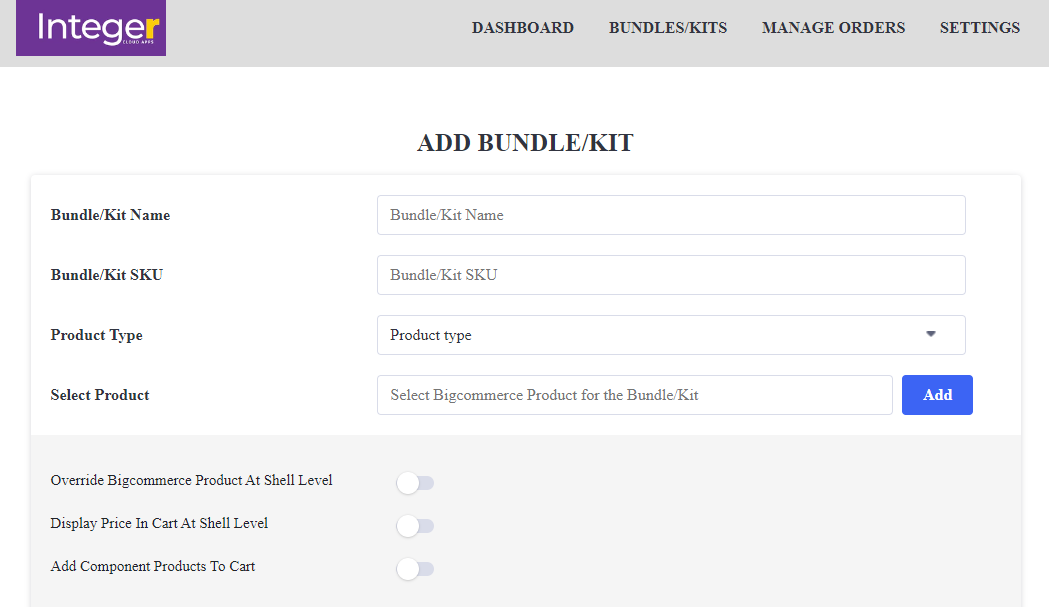
Bundle/Kit Name: Name of the bundle
Bundle/Kit SKU: The SKU ID of the bundle.
Product Type (select from dropdown menu): Select Bundle from the dropdown
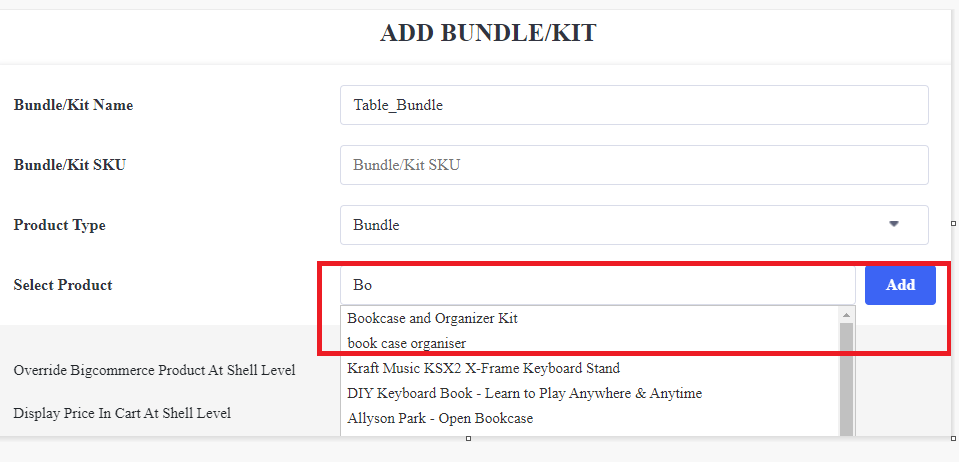
Select Product: When you start typing the product name, all relevant results are populated. You can select the appropriate product and click on Add. Select each product and click on Add to add it to the bundle/kit.
There are 3 options to control the bundle/kit products. At least one of the options should be enabled, otherwise you cannot save the bundles/kits.
Override BigCommerce Product At Shell Level
To replace the product price in BC with the bundle price, enable this option.
Display Price In Cart At Shell Level
Enabling this option will let us show the product price of mandatory products at cart level in the bundle
Add Mandatory Component Products To Cart
Enabling this option will display the mandatory products in the product description page (PDP) and the cart.
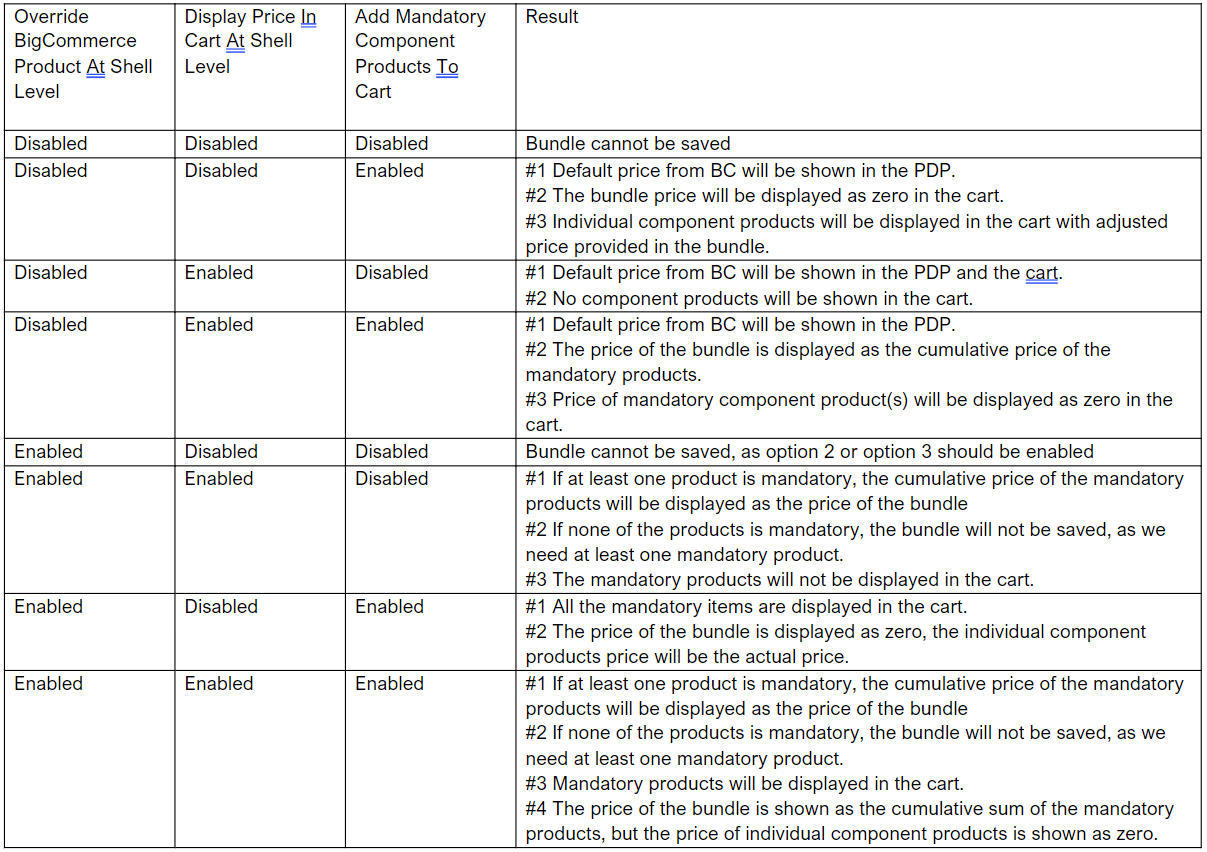
Use the below reference table to know the app behavior with the different combinations of the above options:

Scroll down the page to view and manage the products that you have added.
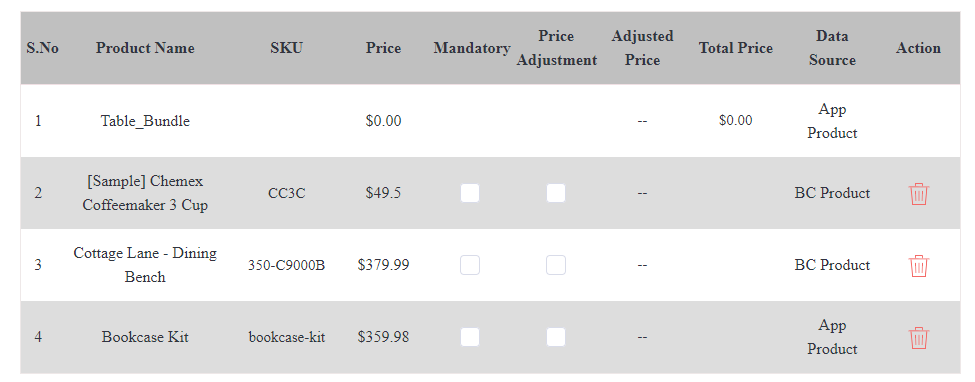
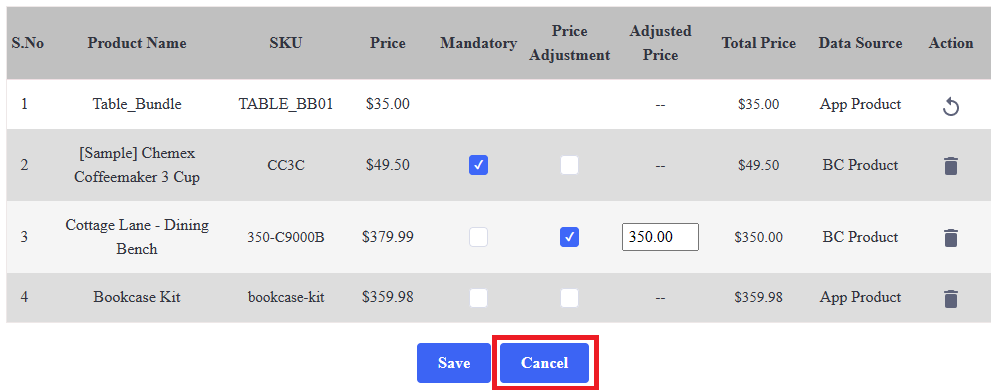
You can make any or all products mandatory and adjust the price using the checkboxes provided.At least one product should be mandatory.
Price adjustment

Reset(USE WITH CAUTION):

Resets and removes the products from the bundle

You have to manually add the products again and save it. From the bundles page, click on “Sync to BC Catalog” to reflect the changes on the BC store.
Cancel
If you do not wish to save the changes made, click on cancel.
Save
Save the bundle. You will be redirected to the bundles/kits page. You can see the new bundle.

You can perform various actions on the page:

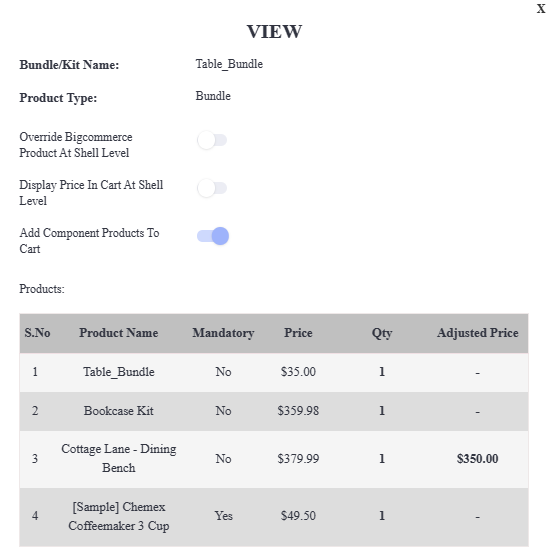
Click on
 for a quick view of the bundle.
Click on
 to edit the kit product.
Click on
 to delete the kit product.
Click on
 to view the kit product on the storefront.
BC Changes to view bundle on storefront
To be able to view the bundle on the storefront, you have toenable the bundlein the big commerce store.
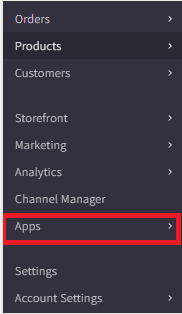
Click on the ‘<’ symbol besides the ‘Apps’ menu on the left menu bar.

You can see the other menu options. Select ‘Products’. You can see the newly added bundle with the visibility ‘disabled’.
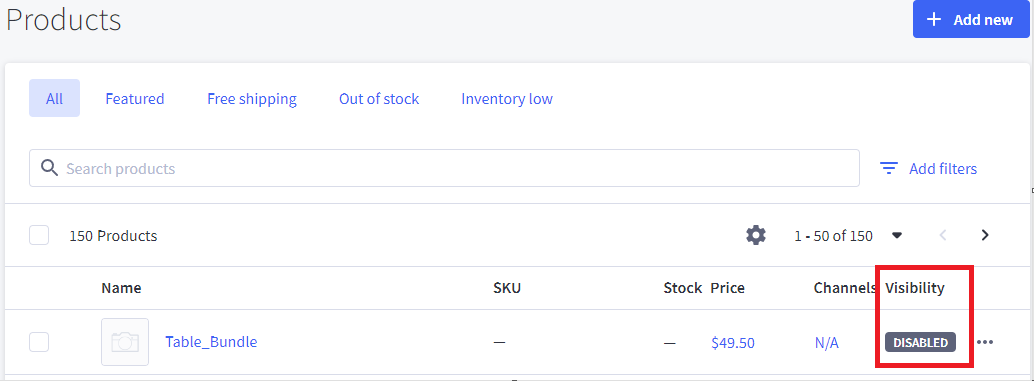
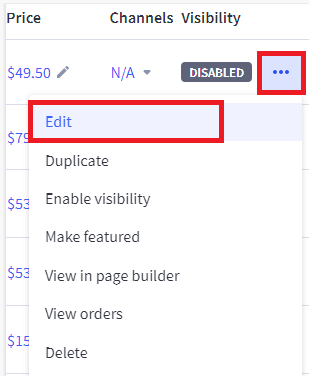
To add more details about the bundle product and change its visibility, click on the 3 dots (…) and select Edit from the dropdown menu.
Enable visibility
You can view the product page, where you can view/add the product details.
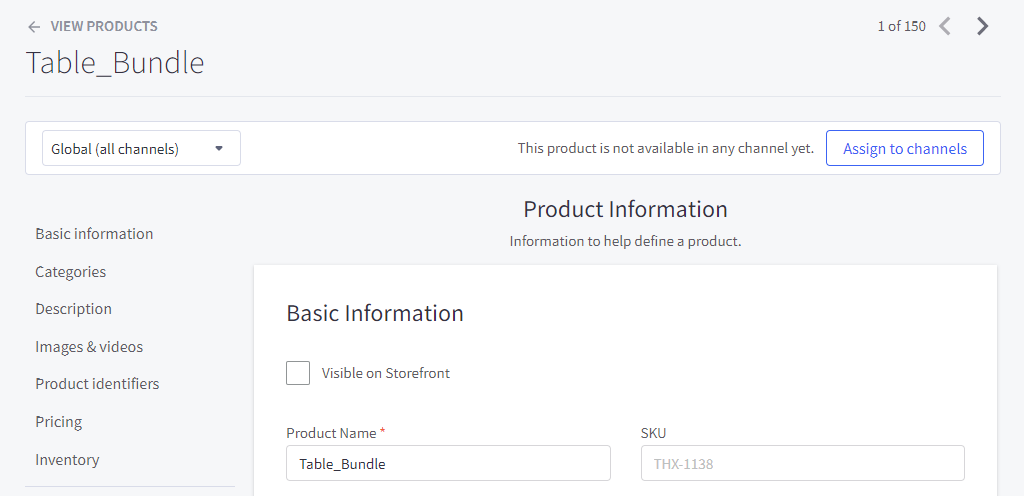
Select the ‘Visible on Storefront’ checkbox to enable the product on storefront.
Add channel
The last step is to assign a channel to the bundle. From the products landing page, click on the ‘N/A’ below the channel field name and select ‘Manage channels’.

On the pop-up shown, select the ‘Integer Kits & Bundles App Store’ and click on Save.

You will get a notification that the product was added to the app channel.

Now, you can see the product on the storefront.
Update bundle details
To sync any changes in the app, go back to the app menu option and select the bundle. Click on Sync with BC Catalog button to syncthe details with the BC.
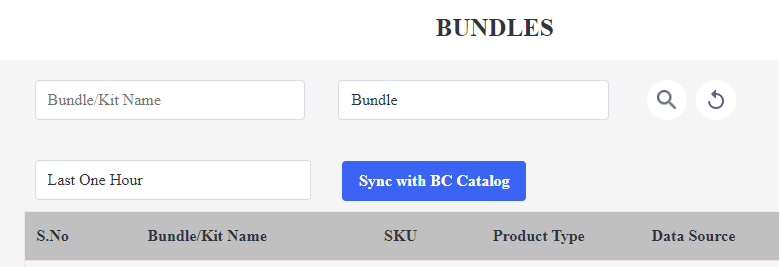
Once the product is saved in the BigCommerce store, you cannot edit the name and SKU from the bundlingapp. These fields will be read only.

You can edit the products and the other options.
View bundle on storefront
To view the bundle on the storefront, click on the pop out icon. This will take you to the website.

Add Kits
Adding Kits is similar to bundles, but you cannot customize the products.
From the Bundles/Kits page, click on Add New. You will be navigated to the Add Bundles/Kits screen.

Bundle/Kit Name: Name of the kit. Example, Book_Bundle
Bundle/Kit SKU: The SKU ID of the kit. This field is not mandatory.
Product Type (select from dropdown menu): Select Kit from the dropdown
Select Product: When you start typing the product name, all relevant results are populated. You can select the appropriate product and click on Add. Select each product and click on Add to add it to the kit.
Override BigCommerce Product At Shell Level
To replace the product price in BC with the kit price, enable this option.
Display Price In Cart At Shell Level
Enabling this option will let us show the product price at cart level in the kit
Add Mandatory Component Products To Cart
Enabling this option will display the mandatory products in the cart.
There are multiple combinations of results possible with the above three options:
nce products are selected, you can see them under the kit. Note that all the products are marked mandatory, and the field is disabled for any , you can edit the quantity of each product in the kit. You cannot make any changes to the kit products in the cart.
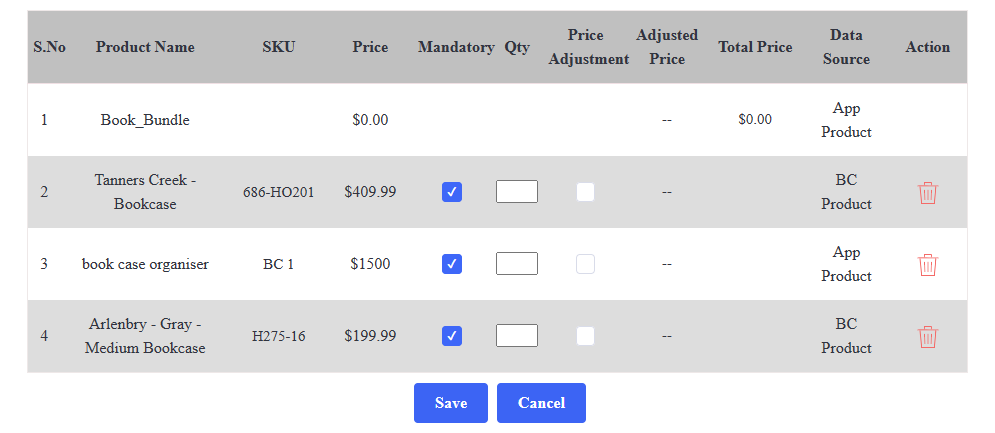
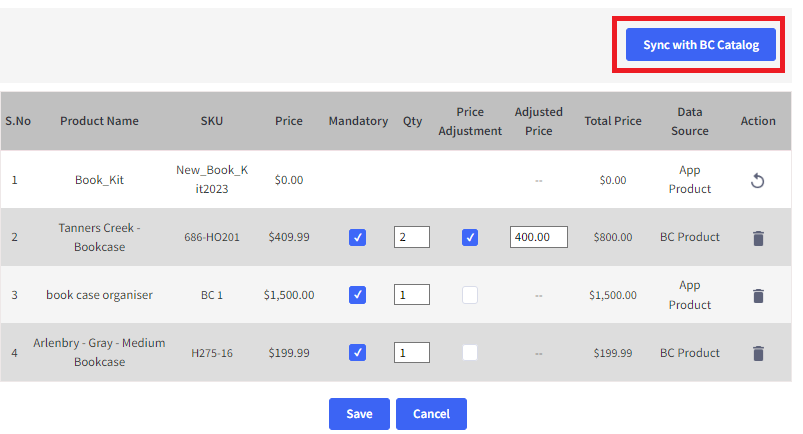
Set the quantity of each product and save the kit by clicking on Save button. If you wish to discard the changes, click on Cancel. Once you save the kit, it will be synced with BC. Once the kit is synced, you cannot change the name and SKU from app.
Price adjustment
You can adjust the price of component products in the kit using the Price Adjustment option.

Reset (Use with caution)
Clicking on reset will reset the kit and remove all the products in the kit.

Sync with BC Catalog
Click on this button tosync the kit and the product details (like price) from the BC app.
Making changes to the BC product page
Go to the BC product page.
Click on ‘<’ on the left side of Apps and select ‘Products’. You can see the newly created kit added to the products.

To edit the product, click on the ‘...’ icon and select Edit.

Enable visibility
You will get the product description page. You can edit the necessary details, including the kit name, SKU and other details, as required. Check the checkbox ‘Visible on Storefront’ checkbox so that the product is available on the website.
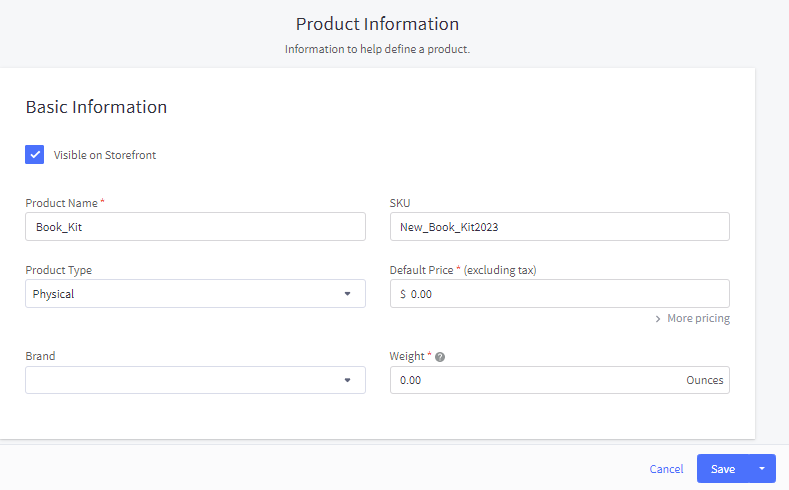
Save the changes by clicking on the ‘Save’ button.
Navigate to the ‘View Products' page to see the changes.
Adding channel for the kit
Next, we need to assign the channel for the kit. For this, select the field ‘N/A’ for the kit in the Channels column and select ‘Manage Channels’.


Select Integer Kits & Bundles APP Store and Save.
View/Edit/Delete Kit on the bundling app
Navigate to the BUNDLES/KITS page on the BundlingApp(via Apps) to perform various actions on the kit.
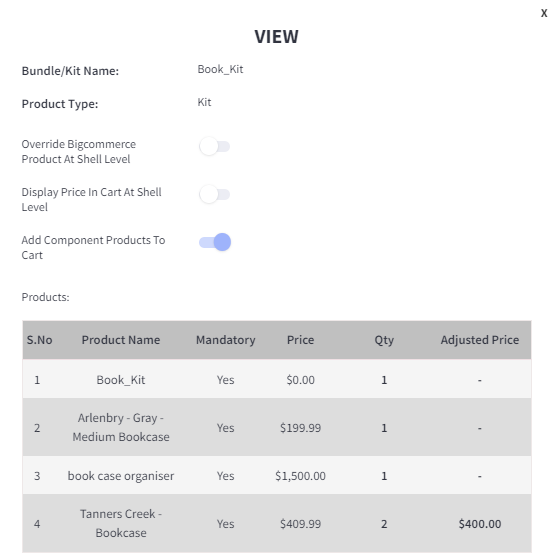
Click on
 for a quick view of the kit.
Click on
 to edit the kit product.
Click on
 to delete the kit product.
View kit on the storefront
Click on
 on the bundles/kits page to view the kit product on the storefront.
Manage orders with bundles and kits
To manage orders with bundles and kits, click on the MANAGE ORDERS menu option from the dashboard.
You can view the orders along with the details like status, order ID, total amount, customer name, shipping method and date.
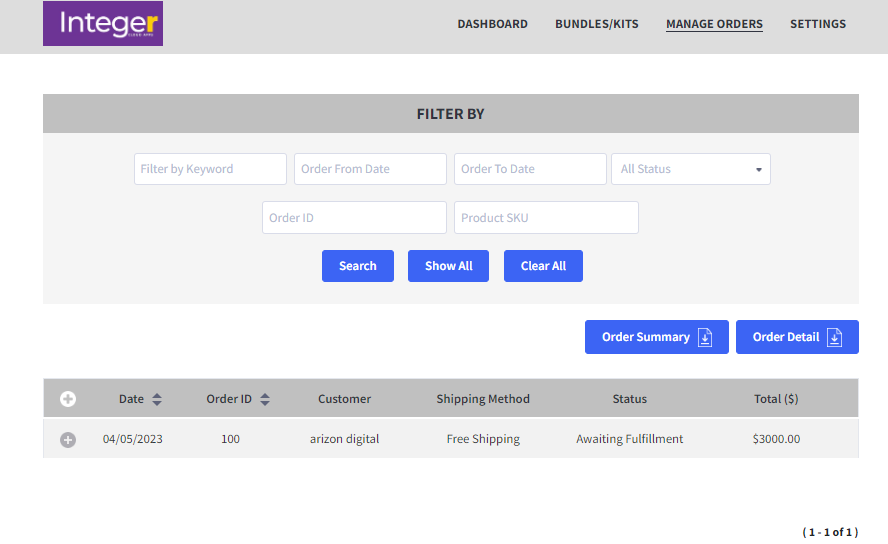
You can use the filter by option to filter the orders:
- Filter by keyword: Search using keywords that identify your order. For example, bundle, table.
- Order From Date/Order To Date: Select the orders for specified date window. For example, 04/02/2023- 04/11/2023.
- Order Status: You can view only the orders with a particular status like pending, awaiting shipment and so on.
- Order ID: Search based on a particular Order ID.
- Product SKU: Search based on a particular product SKU.
View the summary of all orders displayed in an excel sheet by clicking the Order Summary button. To view order details in an excel sheet, click on the Order Detail button. Use the ‘+’ icon on the left of date column to view order details on the page.
Thanks for using the Integer BUNDLE BUDDY app
